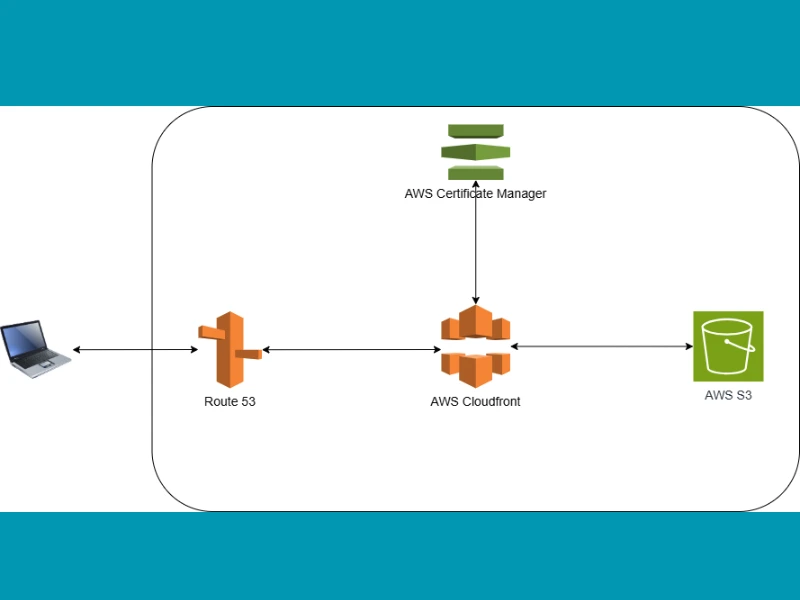
If you have a simple website with HTML, CSS, and JavaScript, hosting it on AWS S3 is a great option. It’s cheap, reliable, and doesn’t require you to manage servers. You just upload your files, and AWS takes care of the rest. However, S3 alone is not the fastest option for users in different parts of the world. That’s where CloudFront helps.
CloudFront is a content delivery network (CDN) that makes your website load faster by storing copies of your files in multiple locations worldwide. So, when someone visits your site, they get the content from a server close to them instead of waiting for it to load from a remote location. This guide will show you step by step how to set up S3 for hosting and use CloudFront to make it even better.
Prerequisites
You will need an AWS account. If you don’t have one, this guide will walk you through setting up a free-tier AWS account.
1. Set Up an Amazon S3 Bucket
First, we need to create an S3 bucket (if we don't already have one) to store and host the static website content.
- Sign in to the AWS Management Console.
- Navigate to S3 and click Create bucket.
- Provide a unique bucket name (e.g.,
my-static-website-msw123). - Choose a region.
- Disable Block all public access, this is an important step.
- Click Create bucket.
2. Upload Static Website Content to S3
- Go to created bucket in the S3 console.
- Click the Upload button.
- Select your static website files (e.g., create sample
/folder, etc.). - Click Upload.
For this guide, I use following sample index.html and style.css file.
index.html
<!DOCTYPE html>
<html lang="en">
<head>
    <meta charset="UTF-8">
    <meta name="viewport" content="width=device-width, initial-scale=1.0">
    <title>My Static Website</title>
    <link rel="stylesheet" href="style.css">
</head>
<body>
    <h1>Welcome to My Static Website</h1>
    <p>This is a simple static website hosted on AWS S3 and distributed via CloudFront.</p>
    <img src="images/sample-image.jpg" alt="Sample Image">
</body>
</html>
style.css
body {
  font-family: Arial, sans-serif;
  text-align: center;
  background-color: #f4f4f4;
  margin: 50px;
}

h1 {
  color: #333;
}

p {
  font-size: 18px;
}

img {
  max-width: 100%;
  height: auto;
  margin-top: 20px;
}
3. Configure S3 for Static Website Hosting
3.1 Enable Public Access
- In the S3 bucket settings, navigate to the Permissions tab.
- Scroll down to Bucket policy and click Edit.
- Add the following policy to allow public access.
{
  "Version": "2012-10-17",
  "Statement": [
    {
      "Effect": "Allow",
      "Principal": "*",
      "Action": "s3:GetObject",
      "Resource": "arn:aws:s3:::my-static-website-msw123/*"
    }
  ]
}
This policy allows anyone on the internet to access the files in your S3 bucket. It grants public read-only access (s3:GetObject) to all objects inside the bucket named my-static-website-msw123. The Principal: "*" means that it applies to everyone, and the Resource line ensures it only affects files inside this specific bucket. This is necessary for hosting a public static website, so visitors can access your HTML, CSS, and other files.
Click Save.
3.2 Enable Static Website Hosting
- In the Properties tab, scroll down to Static website hosting.
- Click Edit, then choose Enable.
- Set the Index document to
index.html. - Click Save changes.
- Copy the Bucket website endpoint provided. You'll need this for CloudFront configuration.
- Write bucket website endpoint in browser address bar, and we can see our static website.
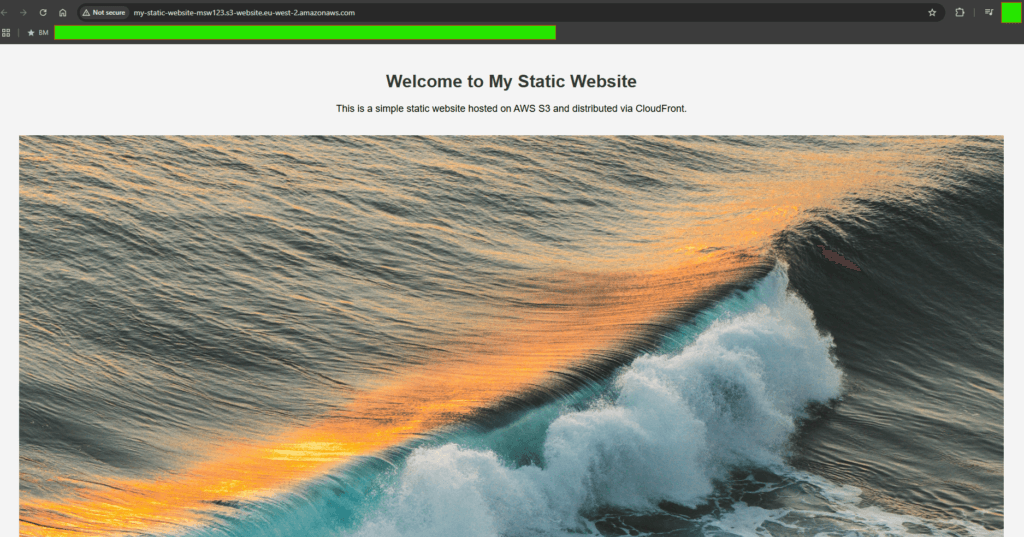
We can access our website using the S3 endpoint, but to make it load faster for users in different regions, we’ll use AWS CloudFront. CloudFront stores copies of our website in multiple locations worldwide, reducing delays and improving performance. In the next section, we’ll set up a CloudFront distribution and configure it to serve our S3-hosted static website efficiently.
4. Configure Amazon CloudFront for Distribution
- Navigate to the CloudFront service in the AWS console.
- Click Create distribution.
- Under Origin, set my static website s3 endpoint, which we copied in last section, http://my-static-website-msw123.s3-website.eu-west-2.amazonaws.com/
- It is upto you to configure Web Application Firewall, but in this guide we select "Do not enable security protection".
- You can adjust other settings as needed, but for this example, I'll leave everything at the default.
- Click Create distribution.
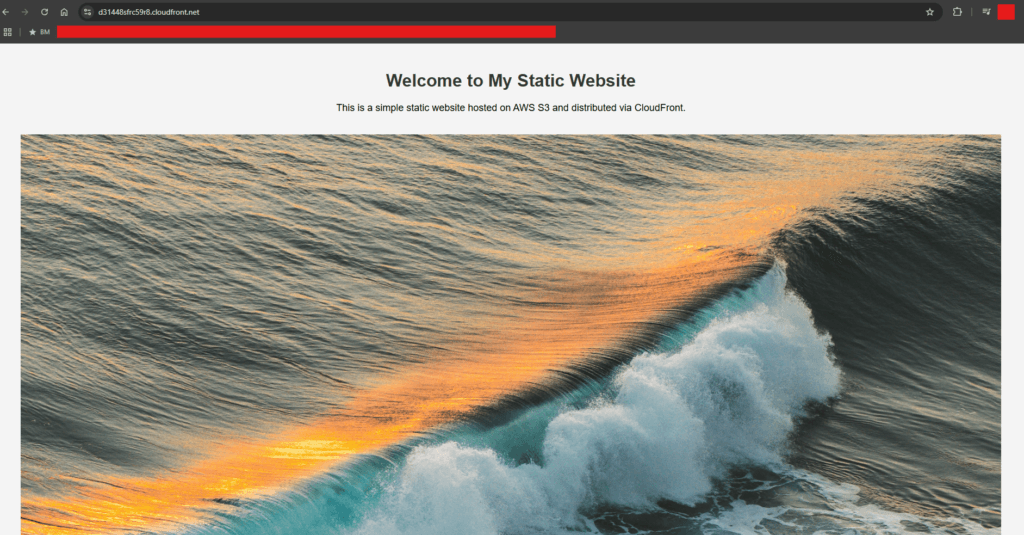
- Cloudfront may take few minutes to setup distribution.
- Once the distribution is created, copy the Distribution domain name.
- You can now access your static website via CloudFront.
I'll stop here with the static website setup. However, if you want to use your own domain instead of the CloudFront URL, the next section will guide you through setting up a custom domain like example.com.
5. Register Your Domain (If Not Already Done)
You can set up your custom domain (example.com) instead of using the CloudFront distribution URL. You need to own a domain. You can register one via AWS Route 53 or another domain provider.
6. Request an SSL Certificate in AWS Certificate Manager (ACM)
CloudFront requires an SSL certificate for HTTPS with a custom domain.
- Open the AWS Certificate Manager (ACM) in the AWS Console.
- Click Request a certificate → Request a public certificate.
- Enter your domain name (
example.com) and any subdomains (www.example.comif needed). - Choose DNS validation for easier setup.
- AWS will provide CNAME records—add them to your domain's DNS settings.
- Once validated, your SSL certificate will be issued.
7. Associate the Custom Domain with CloudFront
- Open your CloudFront distribution.
- Under General settings, click Edit.
- In Alternate domain names (CNAMEs), enter
example.comandwww.example.com(if applicable). - Under SSL Certificate, select Custom SSL Certificate and choose the certificate you requested earlier.
- Click Save changes.
8. Update DNS Settings in Route 53 (or Your Domain Registrar)
- Go to Route 53 → Hosted zones → Select your domain.
- Create an A record:
- Choose Alias.
- Set the value to your CloudFront distribution domain.
- If you use a third-party registrar (e.g., GoDaddy, Namecheap), update the CNAME or ALIAS records to point to your CloudFront domain.
9. Verify and Test
- Wait for DNS propagation (can take a few minutes to 48 hours).
- Visit
https://example.comto check if your website loads via CloudFront.